I have received a number of enquiries asking if I do smaller size doll clothes sewing patterns and the occasional request for larger doll clothes sewing patterns. Branching into other size doll clothes patterns is definitely something I would love to do in the future but I realize that many of you cannot wait until I get around to it. So I thought I would share a tip that may help you to adjust my existing doll clothes patterns that you already have so that you can use them with other size dolls. This blog applies equally to either my 18 Inch American Girl or Cabbage Patch Kids doll clothes patterns.
I wish I had of thought about this many years ago when I first started drafting my doll clothes patterns for Rosie’s Dolls Clothes (my other website), it certainly would have made my job a lot quicker and easier.
Firstly and most importantly, you need to have access to a photocopier that can make copies in different sizes or know how to use your printer to reduce pdf pattern pieces. The next thing to do is have the measurements of the doll that your present patterns fit and the same measurements for the doll you are adjusting the pattern for. When resizing my patterns you will need the measurements for the American Girl doll or Cabbage Patch Kid and you can find these measurements on my Doll Sizing page. You then work out how much smaller (or larger) the new pattern needs to be as a percentage. To do this you divide the measurement of the doll you are adjusting the pattern for by the measurement of the doll of the existing pattern and then multiply by 100. Repeat this for each of your measurements.
The table below shows the measurements of the Cabbage Patch doll on my website that my Cabbage Patch doll clothes patterns fit and the Little Baby Born doll that I am wanting to adjust the patterns for. I am using cm as it is easier for me to calculate.
Cabbage Patch(existing pattern) | My Little Baby Born(new pattern) | % of original pattern | |
Length | 44cm | 32cm | 32/44 x 100 = 72.7% |
Torso | 18cm | 13cm | 13/18 x 100 = 72.2% |
Waist | 31cm | 25cm | 25/31 x 100 = 80.6% |
Neck | 20.5cm | 15cm | 15/20.5 x 100 = 73.1% |
As the resultant percentages are between 72.2% and 80.6% I am going to use 75% as an average and the amount that I will be reducing my pattern to i.e. 75% of the original size.
Now go to the photo copier, find the reduce button, set that to 75% and take copies of all pattern pieces at this setting. Then make small adjustments where necessary. In my case above, I will add a small amount to the waist as I have reduced the pattern more than I should have on this particular measurement. Now make the outfit up using scraps of fabric and test it on your doll. At this point you can determine if any further adjustments need to be made.
The following photo shows an original pattern on the left, then reduced to 75% of the original size and finally at 50% of the original size.
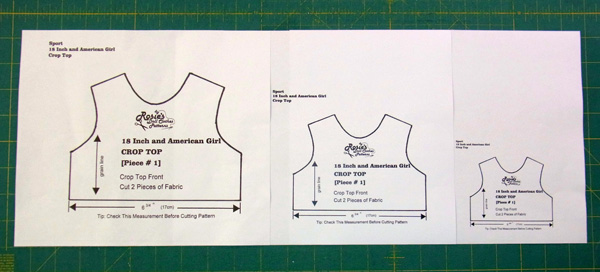
Original pattern, photo copied at 75% and 50% of original
If your doll was larger than the original doll clothes pattern you have, you would simply find the enlarge button and set it to the bigger size e.g. 110% to make the original pattern 10% larger.
You will notice that I did not worrying about the length of the arms or legs as these are easy to shorten or lengthen as necessary. If my original doll has an arm length of 14cm and the doll I am making the pattern for has an arm length of 12cm, I would simply adjust the smaller photocopied sleeve pattern so that it was 2cm shorter than the original sleeve pattern length. The same would apply for the leg measurement if you are making long pants.
Although this method does not take into account all measurements and is based on the premise that the proportion of the dolls are the same (which is not necessarily correct), it is a great method to use to get the basic pattern for you to start from and is much easier than drafting the pattern from scratch each time you wish to make a new smaller or larger pattern.
If you like this tip, I know you’ll love my How to Make Doll Clothes course as I show you tons more tips that take the frustration out of sewing small doll clothes which means you can enjoy sewing doll clothes for yourself or loved one instead of dreading/fearing it. As a special bonus, the course comes with 8 free 18 inch doll clothes patterns with full video tutorials so you will be on your way to creating a wonderful wardrobe for your doll in no time at all.
Happy Sewing
by Rosie Saw
Wow! Great! Sensational! This is more than a tip! This saves labor in resizing doll clothes. Thanks a bunch.
My pleasure Betty. Happy sewing, Rosie.
Thankyou so much Rosie I will try this.I can make my dolls but the clothes have been letting me down.Kind regards Ann
I made up a chart comparing different size dolls and how to enlarge, or reduce pattern pieces by percentage when copying them on a copier. It went from 12inch dolls to 24 inch dolls.
The caveat was that in order for the pattern to fit, the dolls had to have the same, or very similar body type.
So Barbie patterns fit my Cissy dolls with the right enlargement percentage.
I like what you’ve done with your alteration chart.
Rose
Great tip Rosie, I have multiple doll sizes who are, thankfully, all the same shape. This will help me out a lot.
Thanks for this! Unfortunately I’m trying to recreate a vintage wardrobe for my vintage Nanette doll, made in about 1950. She’s 18″ tall, and patterns for 18″ dolls are the right lengths, but she’s much slimmer than today’s dolls, with a 7″ waist. So my Simplicity dress pattern (in vintage styles) has to be redrafted entirely to fit her bust and shoulder shapes. It’s good practice in fitting the tissue pattern and pinning it to size, then tracing the new one on new tissue, because it’s the same technique I’m learning in order to fit myself. But in miniature, with simpler styles. So not too bad, and useful!
Hi Susan, I have just Googled the Nanette doll and she looks lovely. You may still be able to use the reducing method I have mentioned to shrink the bodice and then just add the length back. But as you said, this is great practice for the real thing! Good luck and happy sewing 🙂
Susan, I think I have a couple of those vintage doll clothes patterns that fit the skinny nanette dolls with the tiny waists. I would be happy to share them with you somehow???
Thanks so much for your offer to help Susan by sharing your vintage doll clothes patterns. I have contacted Susan and she would love to borrow your patterns so I will forward her contact details via email. Thanks again, and Happy sewing – Rosie 🙂
Thank you for making this so simple. We have dolls of all sizes and now I don’t need to try to guess at making their clothes fit properly or finding multiple patterns.
Oh Rosie, thank you so much, this is wonderful, my little baby Corolle is about the same size as your New Little Baby Born. My printer/copier will be working hard today. Thank you. Really appreciate it.
My pleasure Helen. Just print off one pattern at the new size and try it first. Make any minor adjustments and then try the next pattern – this way you can fine tune the percentage as you go. Happy sewing 🙂
Thanks for posting this info. Certainly makes the process of making a pattern much easier. I have Daisy Kingdom dolls that are a bit smaller than American Girl dolls. And I have several American Girl doll clothes patterns. Now I can use my printer to reduce them to fit!
Teaching your daughter or granddaughter (or son/grandson) to sew is well worth the effort. Teaching the skill of altering patterns will stand her in good stead when s/he has to alter patterns for him/herself.
For those who sew for Barbie, those patterns can be enlarged for Tonner 16 inch dolls as well as the 22 inch American Model. You may have to piece some pattern pieces together for the larger dolls.
Those Barbie patterns can also be adjusted for the Toni/Sweet Sue dolls of the 1950s. However, those dolls had small/negligible/eliminated busts and you might have more success reducing the 18 inch “AG” girl patterns to fit Toni/Sweet Sue 14-16 inch dolls and enlarging them for the 20-24 inch ones.
Also, if you have a MyTwinn doll (23 inches) enlarging an AG pattern 128% will work.
Keep in mind, though, that, no matter how the pattern is enlarged or shrunk,, some minor length or shoulder or other alteration might have to be done anyway.
Thanks for sharing all this helpful information. Happy sewing, Rosie
It’s great to hear that your great granddaughters are asking to learn how to sew and I hope this blog has been helpful for your resizing of Barbie patterns. You will find other helpful resizing blogs on my Free Resources page. Happy sewing, Rosie 🙂
Can Barbie patterns be enlarged to fit the 22 inch American model dolls? Their body type is the same.
Hi Cinde, I’m sure they can. If you give it a try, please let us know how you go 🙂
If I take. Barbie pattern and enlarge it for a 22 inch doll on the copier, would I set it for 100% or 200% magnification?
Hi Cinde, I don’t know the measurements of the barbie or the 22 inch doll you are referring to so cannot advise on the percentage increase. Please follow the information in my blog above to work out your percentage increase and remember that after doing the increase you may still find that you have to make minor adjustments to the new pattern to make it fit the way you want. So always make up your new patterns that you have adjusted in scrap fabric so that you can make these final adjustments before making it with your good fabric.
Perhaps you would like to replay to OneMercilessMing whose comment is above and ask her what she would suggest as she seems to know about enlarging the Barbie patterns to the 22 inch American Model dolls.
Love to know how you get on and what you find works for you. Happy sewing 🙂
Hi Rosie,
Thanks for the tips, but I would like to ask if you have any tips on how to resize doll shoes?
Thanks
Tina
Hi Tina
I imagine that you could apply the same principal. Measure the length and width of the foot you are wanting to make the shoe for and compare that to the foot size that the shoe pattern is designed for. Work out what percentage you need to increase or decrease the pattern by and then either use your printer or a photo copier to alter the pattern. There will usually be a little fine tuning that needs to be done but that would be a good start. Wishing you success with your shoe making 🙂
Looking at baby dolls for my youngest daughter for her birthday. Would the Cabbage Patch patterns fit the CP Baby or should I try this to resize? Thank you!
Hi Cristiane, It really depends on the measurements of your CP Baby doll. I think they are around 16″, am I correct? If so, you may have to shrink it a tiny bit but then again you may only have to shorten the sleeve or leg length. Have a read of my blog ‘Different Sized Dolls Can Wear Clothes Made from the Same Doll Clothes Pattern’ as it has some suggestions for altering the 18 1/2″ CPK patterns to suit a 16″ CPK doll. Please let us know how you go.
Happy sewing
Rosie 🙂
I used this technique yesterday when I purchased a PDF pattern for a 13″ Dianne Effner “Little Darlings” doll. I enlarged it by 60% to fit an 18″ older AG doll. A 50% enlargement worked for my Madame Alexander doll. Thanks so much for the tip. It was a perfect fit.
I have a 13 inch Revlon doll type doll, 18 inch and 20 Revlon dolls. And I have patterns to fit the 18 inch doll. What would be the percentages to reduce them to fit the 13 inch doll and to enlarge them to fit the 20 inch doll? I am quite bad at math and this would be a huge help. Thank you in advance.
Hi Erin, unfortunately, I’m not familiar with your dolls and I don’t have their measurements. So I suggest you take the measurements of your dolls and add them into a table like I show above and then compare them to those of your 18 inch doll as you have patterns for this doll and it will be these patterns that you adjust. The formula that you would use is for example 13″ doll waist measurement divided by the 18″ doll waist measurement and then multiply the answer by 100. This will give you a percentage. Then repeat this formula for the chest, torso etc and then take an average of all the answers. Then repeat this exercise for your 20″ doll. Hope this helps 🙂
Just remember to redraw the seam allowance so you have the room to stitch it up!
Hi Amy, yes this is important if you are reducing your pattern by quite a lot. I have found that reducing my patterns for the Wellie Wishers to 65% of the original size was fine without adding additional seam allowance to the main pieces, however for tiny straps and other thin pieces I had to add 1/8 inch (3mm) to the seam allowance.
Hi Rosie, I have an Ideal Crissy doll she stands 18″ tall, I’m finding it very frustrating trying to find patterns for her as most patterns are all for American girl dolls. As the American girl is also 18″ tall too. I would really like to be able to make more modern cloths for my girl and I’m am new to sewing but really want to make my girl some clothes myself. Any help / ideals would be appreciated, also I will be trying the printer ideas for my patterns. Many thanks
Tanya
Hi Tanya, it’s great that you are getting into sewing and sewing doll clothes is a fun way to start. Definitely try this resizing technique and be prepared to make the pattern pieces longer because you have to shrink it so much to fit the slim body you will need to add extra back to the length e.g. the bodice length, sleeve, pant leg, etc. Use scrap fabric to start with, make your adjustments and then move onto your good fabric. You will also find that sewing flat for as long as possible makes sewing doll clothes so much easier. You may find my ‘How to Make Doll Clothes’ online course helpful with lots of other tips too and if you purchase this month using coupon code JOLLYJULY you will save 20%. You can find out more about this course here. I would love to know how you go with resizing your patterns. Happy sewing, Rosie 🙂
do you know how much to decrease for a nine inch doll?
Hi Kathy, as my blog explains, it’s not just the height of the doll that you need to look at, it is a combination of a number of different measurements. So please take the time to read my blog and follow the formula that I suggest. You will have to compare your dolls measurements to those of the doll that your pattern has been designed for. Happy sewing, Rosie.
Your doll measurement charts are wonderful, but I was wondering what the bust/chest measurement is for the American Girl and Our Generation dolls are. Can you provide that?
Thank you.
Hi Eleanor, the chest measurement of my AG doll is 29cm and my Our Generation doll is 28cm but these will vary as the dolls are soft and the stuffing placement and quantity will influence this size. Also the older AG dolls seem to be a little larger all round. Hope this helps. 🙂
I am trying to make clothes for my niece’s my life mini doll which is a 7″ doll similar to the American Girl dolls. I can’t find any patterns. What percentage should I reduce the patterns pieces made for the 18″ dolls so they fit?
Hi Tracy, as I don’t have your doll or know the measurements, I suggest that you compare you doll’s measurements to those of the AG doll on my Doll Sizing page and then apply the formula that I have outlined above in my blog. As I also mention, you may have to make further adjustments once you have reduced your pattern.
Hi can you also help me to reduce the sizes on doll knitting patterns?? ie pattern is for tiny tears doll in need it to fit the smaller tiny tears doll, it is a cardigan???
Hi Jules, I don’t knit so really can’t help you other than to suggest you use smaller needles and finer yarn but I’d imagine you would have to also reduce the number of stitches you make but I guess this would depend on how much smaller you want the cardigan to be. I suggest you search for a knitting website as I’m sure they will be able to help you further. Have a great day. 🙂
I was just sitting at the computer trying to figure out how to reduce patterns for my granddaughters Glitter Girl doll that I have bought her for Christmas. She already has an Our Generation doll that I have made a few clothes for. My husband came up with 75% but its not as simple as that as I can now see after reading this. I will definitely have a go at this. This is a great information thanks so much.
Hi Kaye, Yes there will often be a few alterations that you need to make after doing the resizing on your printer. I have done a series of blogs on resizing my 18 inch American Girl patterns to fit the Wellie Wisher dolls that you may find helpful. You can find the first in this series here. Good luck and I’m glad I was able to help. 🙂
Can anyone please help me out here. I’m making rag dolls that measure 21 inches or 54 cm. I have a dress sewing pattern for an 18 inch doll. How can I enlarge the sewing pattern to fit my rag doll please? By what percentage would I need to increase by? Thank you for any advice here,
Hi Chrissie, you really need to take more measurements into consideration as the dolls can be the same height but very different in proportion e.g. one can be a slim doll and the other a very chubby doll. Please use the above table and compare your dolls measurements, especially the waist measurement, to those of the 18 inch American Girl I have listed on my Doll Sizing page seeing as it is an 18 inch doll pattern that you are wanting to resize. Your doll may have the same waist and torso measurement as the American Girl doll and longer legs, in which case you could use the pattern as is and just add length to the hem of the dress. Let us know how you go. 🙂
Well I measured my rag doll and to my delight, resizing an 18 inch simplicity doll dress pattern meant that all I had to do was add 2 inches to the body length, 2 inches to the arms and 2 inches to the legs, everything else was ok. Thank you so much for your info given on the resizing and table. My great niece was overjoyed with her outfit I was able to make resizing an 18 inch pattern thank you
Awesome. So glad I was able to help Chrissie. 🙂
Hi my name is Joy McMinn from Australia and I brought a pattern for a little darling doll which is a Sarah hale dress and I want it to fit my 10 inch Boneka/effner doll so I am going to try your 75% average and see how it goes. When I was on etsy I saw some beautiful historic dress patterns for American Girl who are 18 inch and some for a Girl for all times which are 16 inches what I can’t work out as I am very mathematically challenged is by what % would I need to reduce them buy to fit a 10 inch Boneka doll can you help me
Hi Joy, As the blog explains, you must compare all the measurements of your doll to those of the doll that the original pattern was designed for, not just the height measurement. As I am not familiar with the measurements of the Girl for all times dolls or the Boneka dolls you have mentioned, I am not able to help you. Please use the table and formula that I have listed in this blog and substitute the measurements of your two dolls i.e. the American Girl doll or the Girl for all times doll (depending on what pattern you purchase) and the Boneka doll, then follow the formula. You can find the measurements of the American Girl doll on my Doll Sizing page.